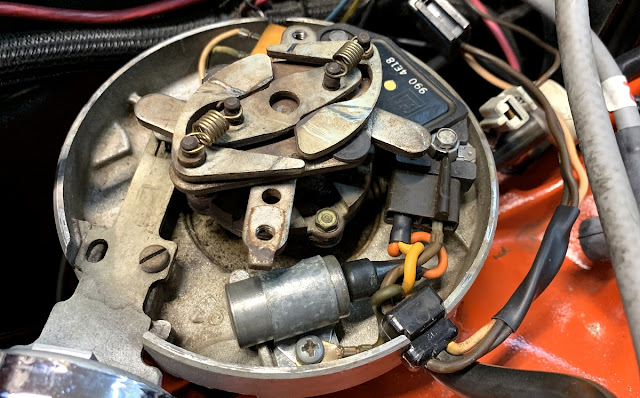
I want my Corvette's engine to idle smoothly so I decided to inspect the distributor cap and rotor to see the condition they were in.
And it was a good idea since there was a lot of corrosion buildup on every contact, plus lots of carbon dust everywhere. It really looked like the 40-plus-year-old part it is.
I have no way of knowing if either the cap and rotor were replaced at some point, but they were overdue. And while they can be cleaned and reused (the car was running okay with them), the cost of new components is only $25 for ACDelco parts.
This is another DIY project that the average home-mechanic can accomplish in a few hours and save quite a bit of money.
REMOVING THE DISTRIBUTOR CAP
Start by removing the air cleaner assembly, followed by the chrome distributor shield if so equipped. The shield is secured by two thumb (or wing) screws, one on each side.
To make your life easier, mark each spark plug wire so they are reinstalled correctly when you install the new distributor cap. You can use clip-on wire markers, something I may add in the future, or do as I did here and use a piece of masking tape with the numbers on it.
As far as I know, the firing order for most Small Block Corvette engines (and Big Blocks, for that matter) is:
1, 8, 4, 3, 6, 5, 7, 2
Next, unplug all wires and move them out of the way. You can then disconnect the ignition, tach, and battery connectors located in the protruding portion of the cover.
 |
| Above: Carefully unplug all electrical connectors by unhooking the lock tabs. |
 |
| Above: The ignition connector has two locking tabs. |
 |
| Above: The tach (brown) and battery (white) plugs have one locking tab each. |
With the electrical connectors out of the way, you can proceed to loosen the distributor cap by releasing the four, spring-loaded, "J" hooks that secure the cap to the distributor base.
 |
| Above: Use a flathead screwdriver and turn counterclockwise as you press down to release each one of the four "J" hooks. |
 |
| Above: The photo above shows one of the "J" hooks after it has been released. |
After all the "J" hooks are loosened, you can pull the distributor cap up and remove it.
At around $15, the cost of a new distributor cap is low, which makes replacing it an easy decision. And the same is true for the rotor.
You can visually inspect the cap for damage and corrosion on the contacts. Corrosion can be caused by a hairline crack on the case which allows water and/or condensation to form, bad grounding, or an overcharging alternator.
As the photos above show, my distributor cap was ready to be replaced. I have yet to determine what caused all the corrosion, and I will address that in the future if it continues to occur.
ROTOR REMOVAL AND INSPECTION
The rotor of the distributor is secured in place by two screws. They usually remain attached to it so just loosen them and lift the rotor off the base.
 |
| Above: The ignition module is secured by two screws. |
 |
| Above: Ignition module, capacitor, wiring harness, and related hardware. |
 |
| Above: I took all connectors apart to properly clean the terminals. |
 |
| Above: The distributor ignition wiring harness. |
 |
| Above: I used a small wire brush to clean the terminals. |
 |
| Above: All components clean and ready to be reinstalled. |
 |
| Above: Reinstalling some of the components. |
 |
| Above: I do not have a compressor, but this CRC spray cleaner and a rag worked great. |
 |
| Above: Dielectric grease must be used when installing the ignition module. I applied a nice coat to the contact surface of the module. |
 |
| Above: And I applied dielectric grease to the base as recommended by Chevrolet. |
 |
| Above: The base of the distributor ready for the new rotor. |
Installing the New Cap and Rotor
I received my new ACDelco distributor cap and rotor and, after a quick visual comparison to make sure they were identical to the parts being replaced, I started the installation process.
I did take my Vette out for a 30-minute shakedown run and I am very happy with how well the car is performing. It now idles very smoothly at 700 RPM.
Lastly, after some research, it appears the corrosion buildup in my cap was caused by ionization, which is what usually happens to battery terminals. I am still investigating what could have caused it to such a degree and will make the necessary repairs if it happens again.


