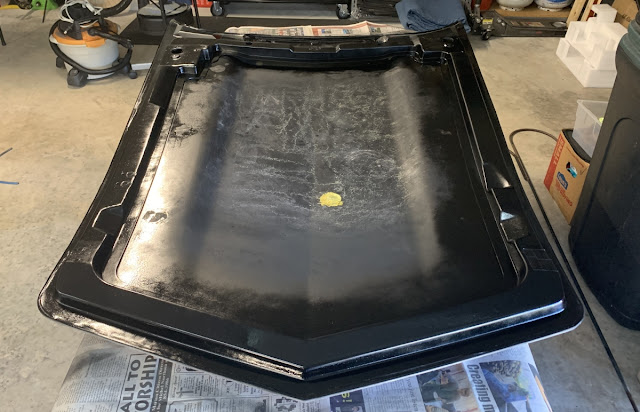
In the first installment of the hood underside detailing project, I disassembled, cleaned, and applied primer to it, getting it ready for paint.
At this point, I decided that the old hood insulation was ready to be replaced by something nicer, so I started my research as to what's available for C3 Corvettes, and the answer was "not that much" unless you're willing to spend a ton of money on a custom liner.
Personally, I do not care for embroidered logos and "bling" of that sort, but I knew I wanted a black liner instead of the grayish ones made out of glass wool fibers, which as effective as they may be, tend to be a dirt and dead-bug magnet.
I took some measurements of the area that was to be covered and made a template as shown above.
And yes, I wanted the new liner to cover all the way to the front edge of the hood, something that eventually would come back to haunt me.
I ordered the hood liner by FatMat, even though it was a couple of inches narrower than the widest point in my hood. I wanted it to span from one edge to the other but it was almost two inches short of that goal unless I was willing to splice it or place it sideways, which still would have necessitated a filler piece either toward the top or the bottom.
In hindsight, that might've been a far better option, instead, but I chose to trim, trim, trim. Something difficult when cutting anything out of foam due to its unsteady nature. And, unfortunately, you can see the results of my handiwork in some of the photos.
One of the videos will also help show how tough it is to make an even radius cut freehand.
But before installing the hood liner I had to paint the exposed or visible hood areas and also remove all the original hood insulation retainers installed at the factory, something easily accomplished with a stiff putty knife and a few taps with a hammer.
The retainers were most-likely attached with a little bit of panel adhesive, and they come off quite easily and without damaging the hood.
For a factory-looking under the hood finish, my go-to paint is Eastwood's Underhood Black, since it has the right sheen for those areas, and the underside of the hood is no exception.
I allowed the underhood paint to cure for about a day, then gave a few areas a light wet sanding with 600-grit paper to correct a couple of areas where there was some sort of contamination which resulted in some noticeable imperfections.
The final coat solved those unpleasant issues almost completely.
I also ordered
new weatherstripping for the top edge of the hood. The original one was hard as a rock, cracked, and had overspray from when the car was repainted years ago. So it was time for a new one.
I will cover installing the new hood weatherstripping in a YouTube video, so stay tuned to
my channel for it as I will cover important tips and details of the installation.
With the hood underside painted, it was time to install the foam insulation, which also happens to have a self-adhesive backing. The kit also includes a small roller which makes installation a lot easier.
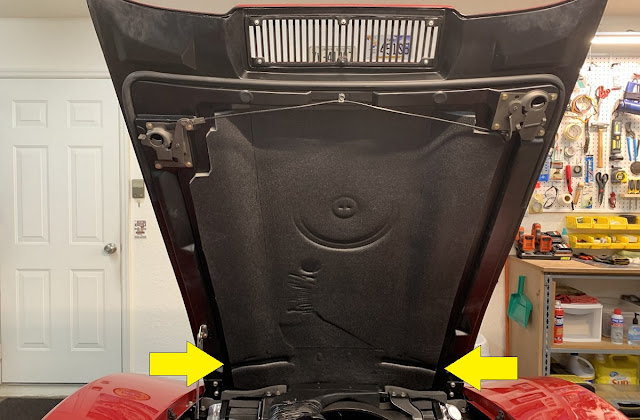
I made reference to the issue that would come back to haunt me at the beginning of this article, and as the following two pictures show, the liner touches several components under the hood, and the two that created the biggest issue were the support-to-hood seals as indicated by the yellow arrows.
The problem is those seals exert enough up-force to misalign the very front of the hood, something that is quite noticeable and unacceptable.
The only solution was to trim the liner (just like the original), so it would allow the seals to contact the bottom surface of the hood without interference by the liner. That solved the issue, but I can tell you that I was fortunate to be able to remove that portion of the liner without much trouble, even though the adhesive put up a respectable fight.
I can only imagine how hard the job would've been had I waited a few weeks to address the issue.
I used the compressed areas of the liner as a guide to cut the material with a utility knife, then removed the excess. And I will mask the whole area and give it a few coats of Eastwood's Underhood Black paint to make it look good.
Lastly, I noticed a couple of holes in the middle of the top edge of the hood, right below the cowling grille. Not clear as to what their purpose (if any) is.
A quick trip to ACE Hardware produced the perfect 1-inch plastic plugs for them, so now they look finished. I was going to trim them a bit near the edge but decided to leave them alone for now.
I am very happy with how my Vette's hood underside looks after all that work, even though I was not attempting to achieve a show-quality finish.
All you need to get the same or better results is a few inexpensive products, a weekend (or two depending on how deep down the rabbit hole you want to go), and a good dose of elbow grease.
I have driven my Corvette a few times for 30 minutes or longer and even though the liner gets warm, the heat dissipates very quickly and it appears impervious to its effects, something that's very important when you're talking about a foam-based product inside a hot engine bay.
As far as durability, only time will tell, but so far I am very happy with the FatMat Hood Liner.
The video below is Part 2 of the C3 Corvette Hood Underside Detailing series.
Subscribe to my YouTube channel and click the Notifications bell to be informed when I upload new videos. And I am also editing a 3-part series about aligning a C3 Corvette hood, or at least the 1973-1982 long hood, as mine was a bit off after I reinstalled it.
Thank you for following my '76 Vette Blog!
Product Links... (#sponsored)


